My Marathon Sweater

11.04.2018


I can pretty confidently say that I'll never run a marathon, so knitting this sweater is probably about as close as I'll get to experiencing what it must be like to run in one.

It took forever.
99% of the time it was incredibly boring, but 1% of the time it challenged my atrophied brain cells.
And I felt like quitting approximately 123 times.

But, in the end, I finished because sometimes I like to show my knitting who's boss.
Now I should say that the negative feelings that I may have about this sweater have nothing to do with the pattern (which is Boxy by Joji Locatelli).  The pattern was well written and I have absolutely no complaints about it.  My gripe is really about learning the hard way what I like to knit.  And more importantly, what I don't like to knit.  Because that's really the main problem with this sweater - the miles and miles (and miles) of stockinette stitch.  I thought it would be perfect for mindless travel knitting, but it ended up being a little too mindless and I had a very (very!) hard time forcing myself to pick it up and finish it.
Now on to the details.  The pattern comes with directions to knit the sweater either flat or in the round.  I, of course, chose in the round, because I'll always choose to avoid the extra step of sewing up side seams if possible.  The sweater is knit in lovely hand-dyed Manos de Uruguay Fino yarn.  I apparently like this color a lot because it turns out that it's the exact same color way as this sweater.  I modified the pattern to make it a bit smaller, and as you can see, it still ended up very...boxy.  The smallest size called for casting on 370 stitches and I cast on 330.  It was a pretty easy modification, but it did leave me scratching my head at times to figure out how this change affected the rest of the pattern.  Nothing that couldn't be sorted out with a little bit of math, but sometimes, I'm just not in the mood to sit my butt down and calculate knitting patterns.
I should also point out that this pattern is meant to  have some purling pattern around the shoulders but I was so frustrated by the endless knitting that in the end that I just stayed with stockinette stitch and I'm perfectly happy with the result.

But mostly, I'm happy that I'm done with this sweater.  It's by no means perfect, but it's done.  And that's perfectly good enough for me.

A Whole Heap of Handmade Garments

10.14.2018

Well, hello there.  It's been a while.  And not for lack of sewing, because that's been humming along over the past couple months as I've worked to fill some gaps in my closet.  Mostly, it's for lack of photo taking because, honestly, I really do hate taking pictures.  And when I finally muster up the effort to take some pictures on the weekend, most of my newly made clothes are in the hamper because I've worn them all week.  Now this, of course, is the best problem to have because it means that not only were the things that I made not utter failures (I've had more than a few of those in my day), but that they're actually well-loved garments and really, what more could you ask for?
Now because of my utter disdain for taking photos I decided that the only way that I'd ever get around to blogging about handmades would be to include several items in one post.  So today, I present my first pair of Ginger Jeans, my first Melilot shirt, and my fourth Wiksten Kimono.  Let's start from the bottom and work our way up, shall we?
I've been interested in making the Ginger Jeans since the pattern first came out, but then I got distracted by the Birkin Flares and then the 
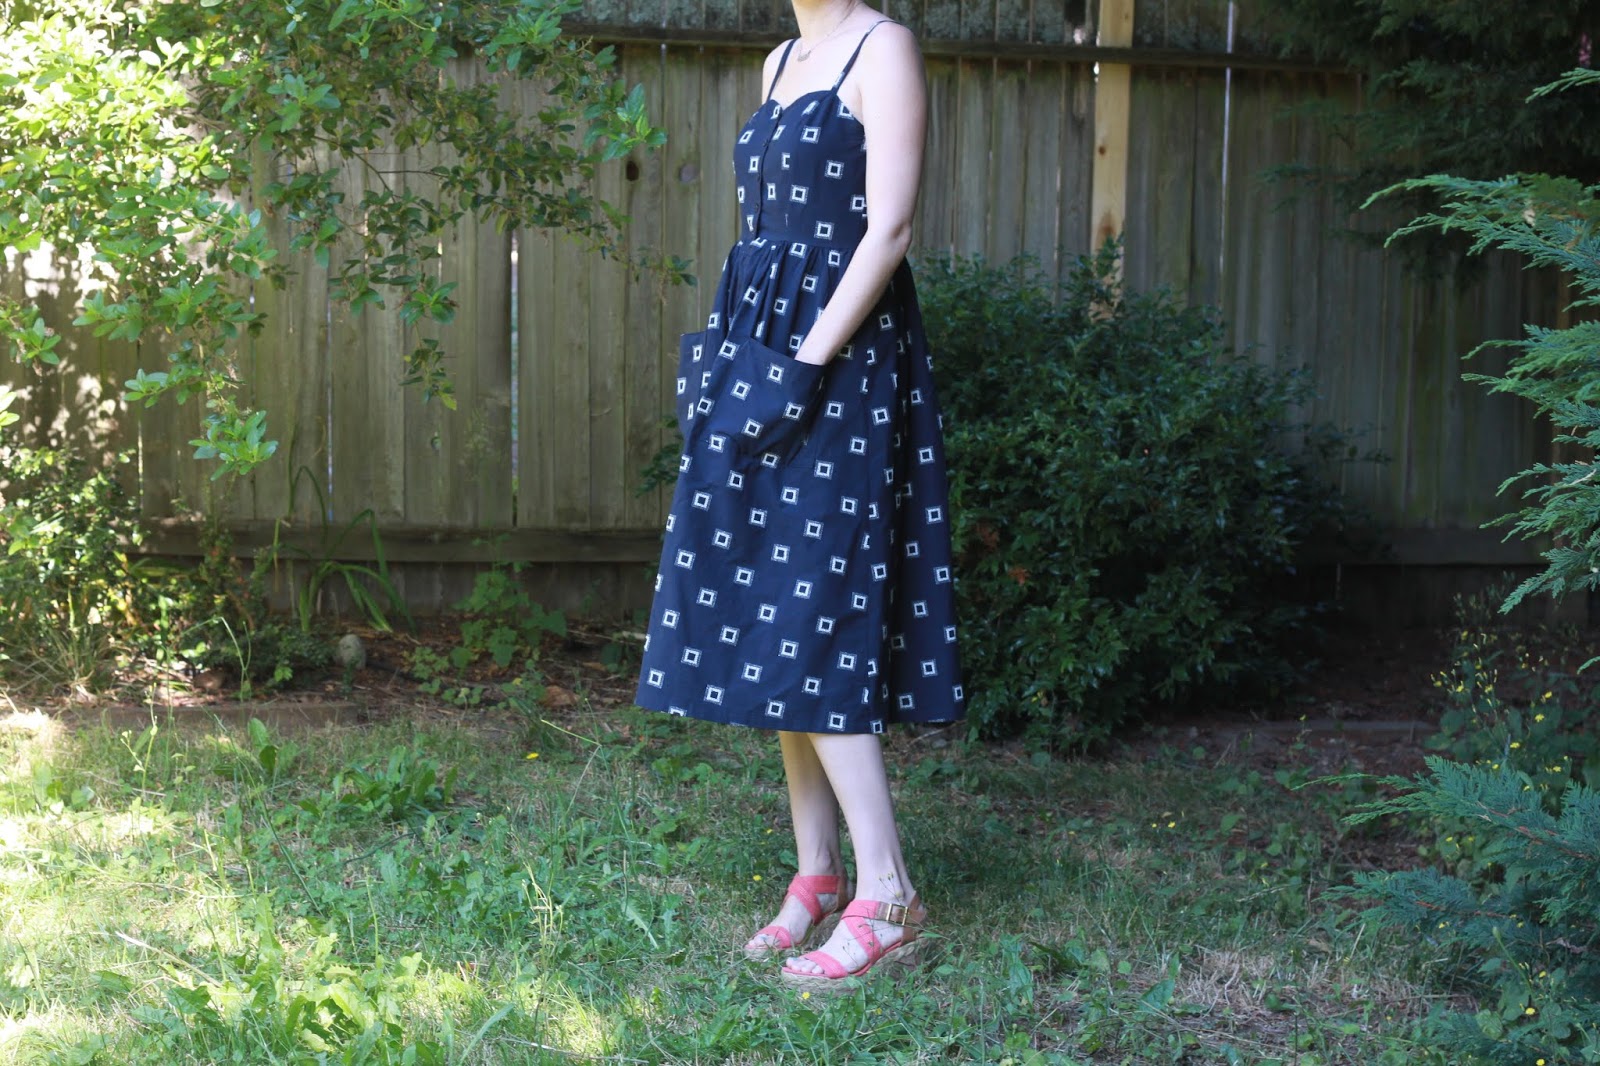
Persephone Pants and when I thought about fitting a new pair of pants I just felt tired.  There's something overwhelming about diving into a new pattern for the first time, knowing that you're going to have make multiple tweaks to get it to fit right.  So, in the end, these sat cut out in my basement for several months until I could muster up the nerve to sew them up.  I had great plans to baste them together first to adjust fit issues (especially since these are made out of lovely Cone Mills Denim), but I knew that I'd never get around to actually making them if I did that because I really hate making muslins.  So, instead I just dove blindly into this project, keeping my fingers crossed that they would look quasi-decent in the end.
I stressed a bit over what size to make because I fell somewhere between a size 8 and 10.  I ended up cutting out a size 10, knowing that I could take in the side seams if necessary, and spoiler alert that's what I ended up doing.  And now that they're all sewn up, I'm wondering if the size 8 would have been a better starting place.  Something to think about for next time I suppose.  And also for next time - they ended up being too long (I'm 5'6" for reference) so I'll need to remove about an inch of length and I'll probably slim down the calf and knees a bit to address some fit issues.  I opted to not interface the waist band because I'm an old lady who goes for comfort above all else and I stand by my decision.  I also had to move the pockets once the jeans were all sewn up because they were way too low in the position that the pattern recommended.  All in all, I'm pretty happy with how they turned out - especially since I took the lazy (wo)man's route and didn't do a whole lot of fitting beforehand.  Apparently, the sewing Gods were on my side this day.
Now on to the shirt - my first Deer and Doe pattern (well, if you don't count the free Plantain Tee).  I've always loved their patterns but I don't have a store close by that sells them, so I'm pretty excited to see that they're now available as PDFs.
It's a pretty basic blouse (no sleeve placket on the short sleeve version) and it went together fairly easily, although I will say that I went back to using these instructions for the collar attachments because in my opinion, these instructions can't be beat.  The fabric is Happy Stripes in the navy colorway by Cotton and Steel.  I actually like the cream color way of this fabric more, but I was concerned that it would be a tad sheer which would mean that I couldn't wear the shirt to work, so I went with the darker color way instead.
And last - but obviously not least - the Wiksten Kimono.  I'm a bit embarrassed to admit how many of these I've sewn, but I really do love this pattern.  And more importantly, I love the finished project.  I've made 2 short ones, 2 medium length ones, and now I want to make at least one long one.  I figure, once I make the long one it will officially be out of my system and then I can move on to some other obsession.
As for length preference, so far the medium length ones are my favorite.  I obviously love the extra length, but I also love the larger pocket.  I wear them for work a lot and you'd be impressed with how much stuff I can fit into the pockets.  For this version, I went with a basic black twill for the outer layer and a Cotton and Steel cotton lawn for the lining.  I wanted something neutral and very wearable, but with a bit of added whimsy for the lining and since I obviously love to wear fabrics with animals all over them, I figured that the butterfly lining would be a good choice.
As for the sizing, I went with my recommended size based on my measurement (a size small).  I know that many folks had to size down when making the version in Makingzine, but Jenny sized down the pattern when she decided to sell it independently and I found the recommended size to fit well (which was a relief because I was really worried that it would come out looking huge).

Persephone Pants + Wiksten Kimono = Love

9.04.2018

Well, this summer has turned out to be much more eventful than expected (and not in all the best ways) so it's been a while since I've posted anything.  This summer has also reminded me, however, that creative pursuits are often the best therapeutic outlet in rough times.  When my dad was hospitalized for two weeks several years ago I knit constantly on a pair of socks and I'm 99% sure that those socks were solely responsible for the maintenance of my sanity.
In any case, back to somethings that I've made recently - another pair of Persephone Pants and a Wiksten Kimono.  Now this is not my first pair of Persephone Pants.  Truth be told, this is actually my fourth.  My first were made out of some Bull Denim from Joanns.  The fit was great but the fabric sags a bit after even a small amount of wear and because they're made from black denim, they're fading up a storm.  The second pair was this striped pair which I still looooove.  For the third pair, I went down a size to see if that would fit better.  Spoiler alert - it didn't and those will soon see the donation pile.  For this pair, I went back to a size 8 and made them out of some duck cloth from Big Duck Canvas.  Between the fairly stiff, thick fabric and probably going up a few pounds in the past couple of weeks, these pants are now really tight (and wedgilicious).
I really do think that the thickness of the fabric makes a huge difference because my striped pair is the same size and remains nice and fitted without being overly tight.  I'm planning on making a full length pair next for the upcoming fall and winter and I'll stay at a size 8 but I plan to use a slightly thinner fabric than recommended and hopefully that will keep the pants from trying to ride up in my nether regions.
Now on to the upper half of my body which is apparently garbed in an ever-so-wrinkled Wiksten kimono (I blame the kimono for the wrinkles because I wore it all the previous day too because I love it so much).  For this pattern I hemmed and hawed about which size to make because everyone commented that you should size down in the original pattern but the ease was reduced when it became a printed pattern so I was at a bit of a loss as to which size to make.  In the end I decided to follow the size recommendation on the pattern and I made a size small in the short length.  Now this kimono uses an ungodly amount of fabric, but that's really the only negative thing I can say about this pattern because I love everything else about it.  Truth be told, I've already made 3 (one in the medium length and two in the short length - maybe one day I'll get around to photographing them but don't hold your breathe).  The one thing that I learned in making this jacket a couple times is that I now cut the pocket lining out of the outer fabric too because I couldn't get the lining fabric to be completely invisible on the outside of the jacket and it drove me a bit crazy so now I eliminate this problem by just making the pocket and pocket lining out of the same fabric.  And I also learned how much I love when pattern matching works out.  Look at perfect collar!

And that, my friends, it basically what you'll find me wearing nowadays.  It may get a little more wrinkled because I'm never taking it off.

Mini Emerson Cropped Pants and Shorts

7.17.2018


 Garment basics - it turns out that kids need them too.  And while I love sewing dresses for the girls (and they usually love wearing them), they're not so practical for everyday wear so I was excited to try out the Mini Emerson Crop Pants/Shorts pattern by True Bias.  With summer quickly approaching, O was in need of some shorts and I wanted to sew up the cropped pant version to see if it was a style that interested her.
In fact, while she initially said that she only wanted the shorts version, I made the cropped version first because I think they're just so darn cute and because I had this striped rayon in my stash that I thought would be perfect for a pair of swingy, drapy culotte-esqe pants.  As it turned out, these short little pants are everything I could have dreamed them to be.  I love the look of the striped fabric with this pattern and while I didn't do the greatest job of stripe matching on the waistband, I'm going to cut myself some slack because they still turned out pretty darn cute.  And they must be alright because O ended up loving them and wears them often.  And every time she does I think, "man, I wish those were in my size!"

For the second version, I made the shorts out of a linen-rayon combo leftover from this project.  The fabric ended up being a great choice for these shorts (although, yes, it wrinkles easily but it's kids' clothes so I'm not gonna stress about it) and I'm equally in love with the way they turned out.
O, however, has a wee little complaint with them.  With a somewhat wide leg, apparently it's a little too easy for others to see up her shorts when she sits like her mother sits - with her legs wide open (what can I say - all those times my mom told me to "sit like a lady" fell on deaf ears).  I tried to convince her that it didn't matter because she obviously has the cutest underwear (because they're homemade!) but this is the age where someone seeing your underwear is apparently a huge deal so we'll have to see if it's a deterrent to her wearing the shorts in the future.
Hopefully not, because she sure does look cute in them!


Jessica Dress

7.15.2018


When I first started sewing garments, I almost exclusively made dresses.  Fitted dresses, flared dresses, woven dresses, knit dresses.  I tried them all and had various levels of success.  There was something thrilling about being able to make dresses as a new sewer and while I'm not somebody who naturally loves wearing dresses, I was definitely able to incorporate them into my everyday wardrobe.  Fast forward a decade, and the truth is that I rarely make dresses anymore.  My garment sewing is much more practical nowadays and filled with lots of basics.  And while I was able to wear dresses intermittently to work in the past, that's not something that I can do in my current role making them much less useful in my everyday life.  Which brings us to the fact that I haven't sewn a dress for me in long, long time (I think this Alder dress was the last dress that I made - hello, 2015).  But in scrolling through Instagram I randomly saw a version of the Jessica Dress by MimiG and my interest was piqued.  And as I did more digging, saw other versions, and found that it was a free pattern, my interest was cemented and it moved to the top of the queue.
I hit up Drygood Designs to look for some fabric and bought the last of this gorgeous blue jacquard.  Originally I was imaging a more drapey fabric for this dress (like a linen/rayon blend) but then I fell in love with this fabric.  When I brought it home, though, I had some definite hesitations about using it for this dress.  It has a more body than I would have liked in a fabric and I worried about how that would look in a gathered skirt.  Plus, I worried that the princess seams in the bodice wouldn't work well with the simplistic pattern on the fabric.  I suppose someone smarter or more patient than me could have done some amazing pattern matching to match things up on the princess seams, but while I have many life skills, pattern matching is not one of them.  In the end, despite my hesitations I decided to move forward with my initial plan.
Now this is where I mention that in making this dress, the person who almost never makes a muslin (me!) actually made a muslin of the bodice.  I ended up cutting out a straight size small but after making up the muslin I took out some width near the top of the bodice and added a wee bit of width around the waist.  I also ended up making the pockets smaller because those pockets are freaking huge!

The actual sewing went together pretty easily.  It relies on some individual customization so there's no suggestions as to how long to make the straps, where to place the buttonholes, and it has no pocket marking for the skirt.  Those things really are best made to your individual body or choices, but I imagine that for a beginner the lack of even a suggestion could be a bit frustrating.  I ended up using 1/2" buttons and placing them every 1.75-2 inches (I can't remember exactly).  I do know that I ended up placing 5 buttons on the bodice alone and 13 buttons all together (I didn't add them all the way down the skirt - this way I have a bit of a "slit" in the front).
Now here's the great and not-so-great thing about making your own garment - since finishing it, I can't help looking down at the bodice and wondering if I should have fit it more around the bust or elongated the straps.  It seems a little baggy around the bop of the bodice, but I also have a bad habit of overfitting things, ultimately making them not the most comfortable garments to wear.  Ben swears that it's not noticeable and it's probably just me being way overly critical in a way that I would never be about a store brought garment.  So today I'll endeavor to remember one of my favorite sayings - don't let the perfect be the enemy of the good.

Mini Colfax Dress

5.26.2018


 With Me Made May quickly coming to a close, this is typically the time that people start to talk about the gaps they've found in their handmade wardrobe.  Not so over here, however, because the fact of the matter is that I have plenty - plenty of handmade clothes, plenty of store bought clothes, plenty of everything I really need.  So yes, I can think about all the things I'd still like to make for myself (because truth be told, there are many things on that list) but lately I've been thinking of all the things I'd like to make for my kids.
Back when I started this blog, that's mostly who I sewed for and I loved seeing my kids in handmade clothes.  Sending them out into the world in a handmade item was like sending them out in the world with a tangible reminder of my love for them.  But over the past couple of years, as I increased the number of things I made for myself, I greatly reduced the number of things that I made for them.  The truth is that between back-to-school shopping and being the lucky recipients of many hand-me-downs from kind relatives and friends, they're not hard up for clothes either, but I miss sewing for them and seeing how excited they are to have a new item of clothing.
And with that in mind I set out looking for a new pattern to make a dress for O.  I quickly settled on the True Bias Mini Colfax dress which just so happens to be incredibly cute.  Now I know that Kelli has said in the past that she likely won't release more kids patterns because they don't sell as well, but to that I say "noooooooo!" because her kids patterns are fantastic.

In trying to work my way through stash fabrics, I settled on this rayon which was a gift from my mother-in-law when she traveled to Indonesia.  I think it was originally meant to be a sari but sari's don't get a whole lot of use around here, so I figured that repurposing the fabric was the way to go.  With all the gold on the fabric, O of course loved it and the rayon makes for a nice, light summer dress.  
Given O's string bean status I cut out a size 7 in width and a size 8 in length (she just turned 9).  It fits her perfectly right now, but honestly I wish it were a tad bit longer to ensure that it fits her all summer.  No worries, though, because there's a younger sister waiting in the wings to steal all of O's clothes.

And now on a totally unrelated note, I present to you the one thing O and I have in common - the ability to make ridiculous faces.  I love this little stinker.

A Sandal Making Extravaganza and Some Tips On Where To Purchase Supplies

5.01.2018

About a month ago I found myself lucky worm my way into a slot in a Rachel Sees Snails sandal making class that was held in Seattle.  The class was a whirlwind hands-on experience in sandal making.  I loved the process and the fact that it doesn't require too many specialized tools to get started (having to make a huge up-front investment is always such a deterrent to diving into a new craft).  Having absolutely no experience in leather crafts, I spent the next week googling some of the basic supplies and trying to locate places to find some of the more specific ones.  Most basic leather working supplies can actually be bought on-line - either through Amazon or specialized leather stores like Tandy Leather Craft.  I headed up to MacPherson's Leather in Seattle to purchase the actual leather but in the end I ended up only buying leather for the soling there. I didn't buy any leather for the uppers because all the leather is sold in fairly large pieces - which come with a fairly large price tags - and I knew that I wouldn't want to make every pair of sandals out of the same leather.  Where's the fun in that?  I also found out that they don't sell rubber soling there unless you have a corporate account, so that required me to do some additional googling to find that product.

Etsy, of course, was a huge help and I ended up getting my rubbing soling from this store and the leather for my uppers from here.  The leather store is a bit of a pain because the leather is not organized by weight and the vast majority of the leather they sell is too thin for sandal making, so it was a slog to go through all the options to try to find the correct weight. In the end, though, it was worth the effort because I was able to buy several 12x12 pieces leather that allowed me to make a couple different pairs of sandals.
The first pair I made was for my littlest kiddo.  She had a some definite ideas in what she wanted - in particular, a diagonal strap across her foot.  Unfortunately, having such a little foot, there were some limitations as to how diagonal that diagonal strap could be but she seems to really like the way they turned out.  This is the kid that rejects about 99% of the things that I make for her, but in this case she put the sandals on right away and headed out of the house in them.  It warmed my little heart.
The second pair I made was for O and this one gave me a little more trouble.  I feel like the fit is not great and honestly, fitting sandals with kids is a bit of a pain in the butt because they are not the most patient of creatures.  She also seems a little less than enthusiastic about how these turned out but I'll give her a little more time because it's basically been raining non-stop since I finished the sandals.
And the third pair were for my most appreciative recipient - me!  I love this blue leather and knew that I wanted to make a strappy, slip-on pair of sandals with it.  Despite loving all sorts of cute sandals, I knew that they also had to be comfortable or they would just sit in my closet, unworn.  Fortunately, with all the straps, it allowed for lots of opportunity for fitting and the straps provide a lot of support around the foot (I can't wear basic flip flops because it hurts my toes too much).  To say that I love the process of sandal making would probably be a bit of an understatement but I'm beginning to realize - exactly how many sandals does someone who lives in the rainy capital of the United States need?

Now, as a disclaimer I should probably note that these sandals are not as "done" as they should be.  Technically they need a little sanding around the outside so that my imperfect cutting is not so noticeable.  Word on the street is that a Dremmel is a great tool for smoothing out the edges but with buying all the new supplies, I figured that I would be responsible with the budget and wait on purchasing yet another thing.  Being a responsible adult can be such a drag sometimes.

Persephone Pants

4.22.2018

 I don't even know where to start this post.

Do I start by talking about the hesitation I feel almost every time I consider trying out a new pants pattern because I often don't feel up to the task of dealing with fitting issues?

Or do I start by talking about how smitten I was with the Persephone Pants Pattern from the moment I first saw it?

Or do I start by talking about how pants sewing has totally stolen my heart over the past year and made getting dressed in the morning a much more enjoyable task?

Or do I just start by telling you how much I love these pants?
Yeah, I'll just start there because I do freaking love these pants.  And while I was (and am) smitten by this pattern and I did hem and haw for several days before making it because I felt exhausted by the idea of dealing with various fit issues, I am so glad that I took the plunge because these pants ended up being everything I could have hoped for.  And don't tell anybody, but I really didn't end up doing any fitting adjustments because fortunately the pattern is made for ladies with big old ten inch differences between their waist and hips and I fit perfectly into the size 8 recommendation (29" waist, 39" hip).  Really the only modification I made was to hem them a 1/2 an inch higher (I'm 5'6" for reference).

As for the actual sewing, this pattern was super-fun to make.  I realize not having an outer side seam can make fitting a bit more difficult but I loved having one less seam to sew and it really makes for a great pattern for patterned or striped fabric since you don't have that side seam to break up the visual interest.  As for using striped fabric, I should have been a little (or a lot) smarter about stripe matching but I ended up with a pretty good match on the front and a slightly less good match on the bum.  You win some, you lose some.

I did manage to match the stripes in the pockets to the pants since you can sometimes see them ever-so-slightly and I went with a bias cut on the waistband and belt loops to add a little visual interest (and to avoid pattern matching hell).
The fabric is an Italian cotton bottom weight that I bought back in November at Esther's Fabrics on Bainbridge Island.  I originally planned to make some Lander Pants with it, but now I'm thinking that I like that pattern in a fabric with a wee bit of a stretch to it.  While this fabric is a bottom weight it's definitely lighter weight than recommended for the Persephone Pants (recommended weight is 10 oz and up), but it seems to still work well with the pattern.
The turtleneck is made from the Itch to Stitch Hepburn pattern and a Pickering knit that I bought from Fancy Tiger Crafts back in 2017.  I know I've mentioned it before, but I love the Pickering Knits and while buying knits on-line can be a bit of a crap shoot, I've always been happy with every one I've gotten from them.  And as for the turtleneck pattern, this is actually the first Itch to Stitch pattern that I made.  It's a fairly simple pattern given that it's a knit turtleneck but it seems well drafted and I love having patterns for basics like this one.
And if I can throw in one last me-made item in this post that may never end - my sandals!  I took a sandal making class with the lovely Rachel Sees Snails, hosted at Drygoods Design, a couple weeks ago and these sandals were the fruits of my labor at the class.  I've been bitten by the sandal-making bug and have made a couple more pairs since that time and if I can get my butt in gear, I hope to write up a post about material sourcing sometime soon.
Alright, my friends, that's a wrap.

Making A Short Sleeved Dress In April Is A Sign of Eternal Optimism

4.15.2018

The stash busting continues - although not so much with scraps this time as I had several yards of this Art Gallery knit left over from making the kids some Alex and Anna Pajamas 2 years ago.  It's a cotton lycra blend that is incredibly comfortable and works great with the Joey Dress.  How do I know this, you ask?  Well, because I made my first Joey Dress with an Art Gallery knit 3 years ago. Ohh, look how cute O was back then (although she's still pretty cute)!
I love that the dress comes with a couple different options and this time around I opted for 3/4 length sleeves, although truth be told, they're more elbow length than 3/4 length.  I also chose the size based on O's measurements which means that I chose a size 2 sizes smaller than would be recommended based on her age and I just added some length to the bodice and skirt.
Having made this pattern before, I can't say that there were any surprises this time around except for discovering that my serger was in dire need of servicing.  I thought it was just a tension issue at first but it soon became apparent that something was seriously wrong and the serging on the inside of this dress is atrocious.  But given that most people don't go around looking at the inside of other people's clothing, we'll just keep that secret between the two of us, okay?

Turning Scraps Into a Mini Ogden Cami

3.16.2018


Now don't get me wrong, I love new fabric and patterns as much as the next person, but sometimes it feels like the act of purchasing new goods overshadows the actual creative process and that's when I find it helpful to take a break from the buying and engage in some stash busting.  Fortunately, I have two little ones to sew for which makes finding uses for leftover fabrics much easier.  While my favorite pattern for stash busting through knits will forever be the That Darn Kat undies pattern, the Mini Ogden Cami is quickly becoming my favorite pattern for stash busting through wovens.  The women's version can often be made with a yard of fabric with some creative placing and the kid's version requires even less (my favorite other pattern for stash busting wovens - the Purl Soho City Gym shorts!).
 This fabric is actually  leftover from making some some Origami Pillows from Sewing Happiness.  I now realize that I probably should have taken some photos of the pillows, but you'll just have to take my word for it that they're lovely and really fun to make.  I had about 3/4 of a yard left over and thought that cotton-linen blend would work great for an Ogden Cami (we'll just ignore the fact that it's still 40 degrees F outside).
While I wish I were a minimalist who could fully embrace the natural beauty of this fabric and the clean lines of the Ogden, I have to admit that I love little extra touches and I added some to this top with some decorative stitching on the straps and some contrast stitching along the hemline.  Nothing earth shattering, but it's nice to add your own personal touches to makes, right?
Now it's back to digging through the stash for other odds and ends to try to make something out of.